Saturday, 9 July 2016

Overseas Exposure!

I was given the great opportunity last week to join the company for a business trip to the Phillipines. 

The objective of the trip was to have a check and meeting with the current distributors there, but most importantly get in touch with groups of the local cycling community to promote and source for new dealers for our products.

The trip was eye opening and the Phillipine locals and clients were really friendly and welcoming. 
More pictures and words to come!

Tuesday, 14 June 2016

Week 8: Certification!

Almost half way through this entire internship journey, and I've already learnt so many things!

The webpage including the maintenance care guide and FAQs is up and running, (still undergoing some development). This site is sure to help new customers who have simple queries and teach users how to do basic maintenance of their bikes at home. The entire guide contains 4 main categories, and in total each category includes around 10 - 20 pictures with articles, write ups and schematic drawings.


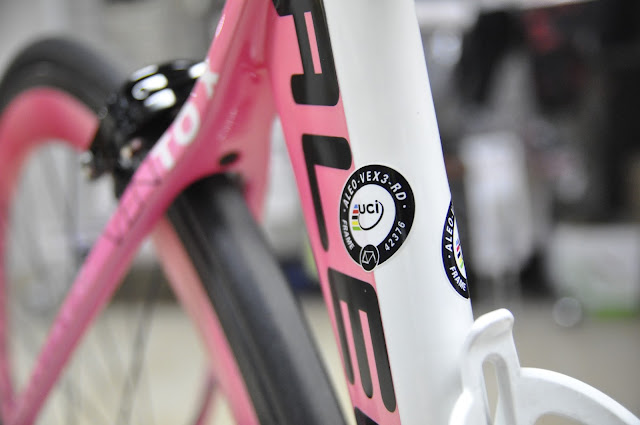
Recently, I have also been helping my supervisor design and come up with a brochure to aid with the launh/display exhibition of one of our newest carbon race bikes. After a 4 month long period, this carbon model has been certified by the International Cyclist Union In Switzerland. This recognition allows this bicycle model to be used in all continental level International cycling and racing events.

To non-cyclists, this may seem like nothing special, but in order to get this approval, the registering process is tedious and costly. Different sample frames must be flown and sent to the Switzerland HQ for checks and technical drawings that are accurate must be sent to the board for approval.

 At the end of it all, a UCI approved frame is allowed to bear the UCI approved sticker as shown above.

Our bike frame is the FIRST ever locally designed bicycle model to receive this certification, hence it's something the company is really proud and thankful for.

I will be uploading some of the sketches and technical CAD drawings that i've helped prepare and also a few pieces of the brochure for the exhibition that we have created. (in the next blog post).

Sunday, 5 June 2016

Update on Weeks 6 and 7

Overseas Exposure

Last week, I traveled to Ipoh, Perak, to take part in my first ever overseas cycling event. A non-stop 100mile (160km) ride across Ipoh. 

Although this may not be work related, it gave me a chance to spend more time with my supervisor and boss and also get to have some hands-n prep in setting up the bicycles for the trip. It was truly an eye-opening event and also a really enjoyable one. The roads in Ipoh were amazing, and the event saw thousands of cyclists from all different nationalities taking part!

Now, back to internship!

In the past few weeks, I have been coming up with detailed guides and taken plenty of pictures and also came up with schematic diagrams for many different braking systems and components.

The content has finally been uploaded onto the company website. 

I've spent alot of time troubleshooting and playing with the layouts before hyperlinking several different pages and posts to make the website look attractive yet effective to consumers.


In the previous week, I was also asked to sit in with my supervisor for a brief on an upcoming project the company is having. A client retailer for the company's bikes has specially requested for a new line of fancy bicycles with loud and crazy colour schemes and patterns to launch. As such, we spent quite abit of time going through different colour charts and design templates to come up with plenty of designs to submit for approval. Around 100 - 200 units of special bikes will be produced with the designs we've selected.

It was a really fun yet challenging process of coming out with so many designs and there were plenty of factors to consider such as how the consumers would react etc. Great exposure and I'm glad that i was involved in this project!

Sunday, 22 May 2016

Into a new week!

Just a quick update before heading back to work tomorrow.

Last week, my LO visited me at my workplace. I could tell it was a very eye opening and new experience.

It was great to talk and discuss about internship progress and also insightful to hear about other company experiences from my LO. My supervisor also personally prepared and showed some materials and projects that the company undertakes.

This next week will be more packed and challenging and I'm looking forward to it! Will update more in the next post.

Tuesday, 10 May 2016

Week 4 Edits

< Into Week 4 >

This week, most of my colleagues are back from the Shanghai Bike Exhibition. 

As mentioned last week, I've been generating content and material for the website. I've recently downloaded Photoshop and have started learning how to edit and crop pictures for sale use.

Photoshop is a really useful tool with alot of editing capabilities. The last time I've used it was during secondary school (a very brief introduction). But now I realize it's a really great skill and tool to have. 

Product pictures can be edited nicely and clearly so that they appeal to customers. 

Here's a short example of some really basic and simple edits I've done yesterday.

Was trying out basic cropping and also removing the wordings on the brake caliper.


Really fun application to use and there's definitely a lot more for me to explore and learn!

Thursday, 5 May 2016

The Selling Process

< Professional Selling >

We're almost at the end of Week 3!

This week I've been continuously working on content and images for the company website and I've also been given the admin rights to familiarize myself with the online platform.

As mentioned in previous posts, I've been given more exposure to Aleoca's high performance customization carbon bikes. I've also been able to watch my boss handle and speak to clients who visit or call to place their custom bike orders. This just reminds me of what we've learnt in our Professional Selling module, the different steps that make up the selling process.

From the moment the customer calls/walks in, it all begins with a friendly handshake and a warm welcoming introduction. 

Moving further ahead into the selling process, I hear my supervisor asking the client exactly what type of bicycle he's looking for and also what type of riding he's commonly doing. It may all seem really simple and straightforward and it actually is -- we're simply finding out the customer's needs :)

As the conversation continues plenty of questions by the customer are answered. For example, why this kind of frame? What's the difference with this handlebar? Lots of technical questions which my supervisor replies and explains in the simplest and most understandable way.

As a seller it's not just about selling the most expensive bike or pushing clients to choose the best and pricey components (that he doesn't actually need). It's about understanding the needs of the customer and doing your best to meet those needs.

At the end of it all (alot of technical jargon), a built list of every single component for the customer's bike is completed, and each component is carefully picked to suit his style and type of riding!
The customer is satisfied, and so are we :)

Here's a list of all the different components and also some of the reasons why they've been selected!

Frame
The customer settled with an aluminium/carbon mix road frame. He isn't much of a road rider so an aluminium frame, although heavy, would provide more comfort and shock absorption during leisure riding. Something interesting with this particular frame is how the manufacturers blend the Carbon and alloy together:

 The Carbon is heat treated and fused together with the aluminium frame. This offers more stiffness on the rear stays!

Fork, Handlebar and Stem
Instead of the usual drop handlebars (those really low aggressive ones), we've prepared a set of flat (normal) handlebars to go with his frame. The flat bars give him a more upright and comfortable position. The handlebars we've chosen are also fully carbon.

His bike will also be fitted with a full carbon fork. You can clearly see the weave of the 12K Carbon Fiber:

And also an Aluminium Carbon-wrapped handle stem to hold it all together:
Lastly, just a few other components to go along as well: Saddle(left) and Carbon Shell Derailleur (Right)


Couple other components have been ordered and they'll be delivered soon for the customer.

To sum this post up, product knowledge is definitely important and I do hope to get a chance to learn and try out the selling process with customers in the future!


Monday, 2 May 2016

Higher Performance

< Carbon Fiber Construction >

The properties of carbon fiber, such as high stiffness, high tensile strength, low weight, light temperature tolerance and low thermal expansion, make them very popular in aerospace, military, motor racing, along with other competition sports including cycling.

Most bikes are made with aluminium or steel which are more affordable and also more durable. But these types of bikes do have their downsides as well, they are heavy and prone to rust.
An image showing a simple steel frame


Carbon Fiber on the other hand, is significantly lighter and stiffer. And a different layup of carbon fiber threads can result in different weaves of carbon with different properties (flex and strain)

That is why for Aleoca's High Performance Bikes, the frames and components are made of full carbon fiber in different layups of carbon. (Like many bikes in the market today)


The different types of carbon weave are mainly 3K, 12K, 1K and UD (Uni Directional). Plenty others exist but these are the common ones that the bikes here utilize.

The different weave numberings, (3K, 12K, 1K etc.) refer to the different woven fabrics that make carbon versatile to work with. Typically bunches of carbon fiber strands (yarn) are woven bi-directionally (weft and warp). The manner in which the weft and the warp are interwoven is the weave pattern. - (Windsail Bike, Carbon Fiber Explained, 2015)

Different carbon layups are used on different parts of the bike to optimize the riding experience. For example, a stiffer carbon at the bottom bracket (pedal area) so that all the power is transferred etc.


I have gotten a chance to tune some of the high end carbon bikes and also assembled a set of carbon fiber wheels.


The bike on the top is a Time Trial Bike, used in Time Trial Races or Triathlons. Aleoca produces this bike with UD Uni Directional Carbon. This bike is primarily built with optimal aerodynamics.


Here are a pair of custom built Carbon Wheels that are laced with Ceramic bearings. I got to assemble these wheels and help install them on a bike. 

These wheels are really deep (The length of the profile) as they are built to be aerodynamic. Yet they are still very light as they are fully carbon.

Installation includes placing the inner tube and tire on, and also fastening the caps of the hub and also the quick release.

In the process of installing the carbon wheels


Overall, the engineering behind carbon fiber is truly amazing. How thin strands of carbon thread can combine and take the weight of a rider at high speed and even other extreme cases is truly amazing. 

It is important to understand different types of materials and their properties before placing them together or building them.

More to come in the next post!

Tuesday, 26 April 2016

The Perfect Fit

< Mid Week 2 >


A brief update about the first half of week 2.

After a tiring week of hands on assembly work (in the warehouse workshop), I've moved inside the office and to my own personal desk. 

My first task will be developing and generating content to be uploaded onto the Aleoca Website. Lots of interesting articles and guides that will help customers with their FAQs or inquiries.

A picture online showing a rider from the Kenyan Riders cycling team. A Continental Pro Level Team that's currently racing internationally on Aleoca bikes!

Definitely one of the unique selling points of the company


Somewhat similar to human anthropometry, included in my preparation guide are basic guides on choosing right bicycle sizes based on a person's height and measurements.

Plenty of sizing charts and calculation methods exist online however I've had to take measurements specific to some of our bike models and also ensure that the estimations are correct.


Sunday, 24 April 2016

Weekend Ride with Clients!

< Weekend Social Ride >


This weekend, my supervisor and boss invited me to join them for their weekly ride with their customers and their own cycling team. 

Cycling is growing really popular in Singapore. On weekend mornings you can easily see hundreds or even thousands of cyclists on the roads!


I joined the Aleoca Cycling Group on Saturday and Sunday and in total rode about 180km.


In our marketing modules like (Personal Selling, Principals of Marketing), there is plenty of focus on knowing the consumer and coming up with customer profiles or personas.

This weekend ride allowed me to mingle with customers and also get to know more cyclists who share the same passion and love for the sport as I do.

My bike (left) together with one of our client's bike (right)


The high end racing performance bike from Aleoca. Easily costing a few thousands!


Learnt a lot and got to make new friends this weekend, can't wait for next week!


Saturday, 23 April 2016

More about the Company

< The Bicycle Makers >


"bicycle, often called a bike or cycle, is a human-powered, pedal driven, single track vehicle having two wheels attached to a frame, one behind the other." - Online definition 

The company I have chose to work with isn't just any other bicycle manufacturer (thousands in the world), Aleoca Pro Singapore is the only Singapore Home-Based bicycle brand that produces bikes locally and abroad. To be able to work in such a prestigious and home grown company definitely makes me feel proud!
  
The Aleoca Logo (2009 - Present)

Established in 1996 with the mission "To build quality and affordable bicycles for all types of cyclist", Aleoca has definitely delivered and has kept that mission in mind til today.

As I have mentioned in my previous post, they manufacture all sorts of bicycles to tailor every different type of customer.

After speaking to the boss of the company, I am inspired by his motivations and true beliefs in the managing of his business. He truly believes that bicycles should be kept affordable and attainable to everyone no matter what age or social status. 


 A rugged mountain bike for off road use

Bicycles built by the company can range from under a $100 all the way to $800. And in the recent years, the company has recently spent plenty of time and research to develop a new high-end line of high performance race bicycles that cost well over $3,000 each. (My most favourite segment to talk about in the coming weeks)


After spending a week in the warehouse carrying out both observation and hands on work. I've gotten a very good feel of the types of bicycles they work on and also how different every bicycle is. Aleoca has close to hundreds or even thousands of different models, so remembering every single one of them is definitely a daunting task.

I'm thankful that in my first week of work, the assembly staff workers ( a mix of China and Indian nationals) were very friendly and very welcoming to help guide and teach a new guy like me!

Here are a few glimpses of my practical hands on phase with assembling new bicycles:

Part 1: Arrival of new bikes


The warehouse office is stockpiled with mountains of cardboard boxes like those shown above. All of these boxes contain a brand new bicycle that is 60% into completion. These bikes are more commonly flown in from the full manufacturing plants in China. Plenty of containers bring these in every month to replenish the local stock.

The bikes in these boxes as mentioned, are a little more than half completed. The main structure of the bicycle is ready, just that the components like the handlebar, seat, pedals, gears and brakes, are not fit in properly.

The job for us is to then assemble all components properly and make sure they work perfectly (The tuning part is the most challenging)


The bikes are all properly wrapped up and safely packaged to prevent any extra damage to the components.

With all the different tools and equipment, each is then carefully put together by hand and with patience!

Part 2: Basic Assembly

(Left) Shows the unassemble handlebar and wheel (Right) A box of accesories including the saddle(seat) the pedals and cables etc. All of these items arrive inside the same cardboard box as shown in part 1.

A representation of all the different bike tools the assembly workers are given. (Alot more)


Part 3: Fine Tuning and Completion

When i first assembled my first bike, with guidance and help, the feeling of accomplishment was so satisfactory. :)

But in subsequent bikes I did make mistakes and the workers were still very nice and guided me every step of the way. It's always better to make mistakes and troubleshoot them. This not only makes me analyse, but it also gives me better knowledge.

All the skills i learnt will definitely come in to play when I deal with customers in the future. As my supervisor told me, "As an engineer, you must be super aware of every single detail and part of your product. When problems arrive, always analyse and make use of knowledge and brain-storming to solve the issue."


Here are a few pictures of some completed bicycles that I myself assembled and tuned. In one week alone I probably learnt and worked with more than 20 types 


One of the simpler and easier bikes to assemble. Due to the lack of extra features like suspension and wider gears, this bicycle is very affordable and easy to use.


Something more common nowadays - A foldable bicycle. What I've learnt is that it's really important to make sure all the joints of the folding mechanism are properly fastened.


A more modern and classy looking City Bike. City bikes are tailored for urban riding at a more relaxed pace. The brakes for these bikes are specially designed (Will have a separate post on that).


Those above are just a few of the many different models I've worked on the past week. I have alot more pictures about Carbon Fiber bicycles which I will update in the next post. 

Some important takeaways from this week:


- Always important to be precise in your work. (Adjusting of brakes, screws etc. as these concern our user's safety)

- Communication is very important. The workers (some China and Bangladesh) somehow still manage to communicate even though they do not speak proper English. Initially I struggled understanding both parties even though they were all very eager to help me. A very friendly and welcoming bunch!

- Passion and Knowledge. As mentioned earlier I'm a very avid cyclist. To be able to learn so much in just one week is something that I'm really happy and satisfied with. 


More technical specs of bicycle braking and my takeaways will be coming soon, stay tuned!

Looking forward to the start of Week 2 tomorrow :) 


Friday, 22 April 2016

Fresh Start

< The First Week >


The first week of internship have finally come to an end. What a tiring but fulfilling start!

The most important thing for an engineer is to fully understand the system and functions of his product/machine. And that is why for this first week, I’ve spent my time doing hands-on assembly work on all different types of bicycles.

Studying and assembling a bike myself allows me to know how different components work and also why some of them are designed this way (Also allows me to discover some flaws and brainstorm and how to correct these defects). Also thinking back on the entrepreneurship/ selling business modules I have taken in previous semesters, it is always important to know your product well so that you can educate customers about it.

This week, I was exposed to many different types of bicycles. Ranging from the simplest kids bikes, mountain bikes, and fordable bikes all the way to city bikes. I’ve learnt that every single type is different and unique in their own way, and each mechanism is carefully designed to suit the type of riding/braking style needed.

I will be posting a detailed list of all the different brakes and systems I’ve assembled with plenty of pictures in the next post (Currently taking a long time to attach images). It’s amazing how many different bikes I’ve learnt about in just 5 days!
In the next post, I will also be highlighting some of the challenges and difficulties I’ve faced and also my takeaways from the first week of internship!

Stay tuned for the new post tomorrow! In the meantime, it’s time to unwind after a hard and fulfilling week of work! :D


Monday, 18 April 2016

Prologue

< A brief introduction >

Months of holidays have passed and finally the time has come for the semester to begin. But instead of heading back to school to hit the textbooks and brainstorm for projects -- it's time for internship instead.

16 long weeks in the real world working with real bosses and new people.

I am both excited yet nervous to begin these 16 weeks but I'm sure this journey will prove fruitful and enjoyable :)


And a small introduction about myself as well:

Currently a third year student in Engineering and Business who really loves spending time on the road on a bike :)

I'm thrilled to be able to intern at a self-sought company that handles and deals bicycles locally. 
It may not be the best brand out there but definitely it's an awesome opportunity to learn and work with something that's clearly my passion.

I do hope these 16 weeks are enriching and that it'll be a smooth ride!(Just like my weekend rides on my bike)

Till the next post!