Saturday, 9 July 2016

Overseas Exposure!

I was given the great opportunity last week to join the company for a business trip to the Phillipines. 

The objective of the trip was to have a check and meeting with the current distributors there, but most importantly get in touch with groups of the local cycling community to promote and source for new dealers for our products.

The trip was eye opening and the Phillipine locals and clients were really friendly and welcoming. 
More pictures and words to come!

Tuesday, 14 June 2016

Week 8: Certification!

Almost half way through this entire internship journey, and I've already learnt so many things!

The webpage including the maintenance care guide and FAQs is up and running, (still undergoing some development). This site is sure to help new customers who have simple queries and teach users how to do basic maintenance of their bikes at home. The entire guide contains 4 main categories, and in total each category includes around 10 - 20 pictures with articles, write ups and schematic drawings.


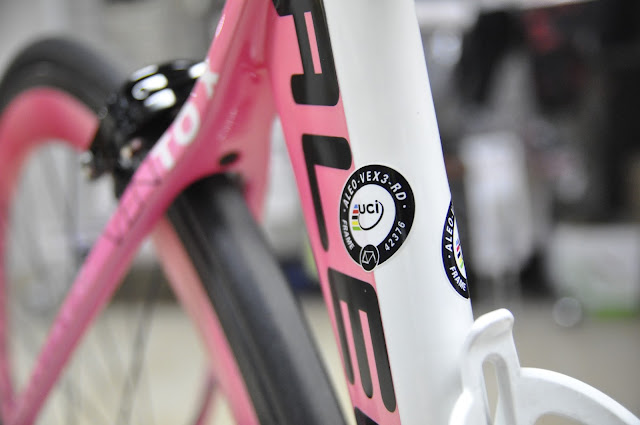
Recently, I have also been helping my supervisor design and come up with a brochure to aid with the launh/display exhibition of one of our newest carbon race bikes. After a 4 month long period, this carbon model has been certified by the International Cyclist Union In Switzerland. This recognition allows this bicycle model to be used in all continental level International cycling and racing events.

To non-cyclists, this may seem like nothing special, but in order to get this approval, the registering process is tedious and costly. Different sample frames must be flown and sent to the Switzerland HQ for checks and technical drawings that are accurate must be sent to the board for approval.

 At the end of it all, a UCI approved frame is allowed to bear the UCI approved sticker as shown above.

Our bike frame is the FIRST ever locally designed bicycle model to receive this certification, hence it's something the company is really proud and thankful for.

I will be uploading some of the sketches and technical CAD drawings that i've helped prepare and also a few pieces of the brochure for the exhibition that we have created. (in the next blog post).

Sunday, 5 June 2016

Update on Weeks 6 and 7

Overseas Exposure

Last week, I traveled to Ipoh, Perak, to take part in my first ever overseas cycling event. A non-stop 100mile (160km) ride across Ipoh. 

Although this may not be work related, it gave me a chance to spend more time with my supervisor and boss and also get to have some hands-n prep in setting up the bicycles for the trip. It was truly an eye-opening event and also a really enjoyable one. The roads in Ipoh were amazing, and the event saw thousands of cyclists from all different nationalities taking part!

Now, back to internship!

In the past few weeks, I have been coming up with detailed guides and taken plenty of pictures and also came up with schematic diagrams for many different braking systems and components.

The content has finally been uploaded onto the company website. 

I've spent alot of time troubleshooting and playing with the layouts before hyperlinking several different pages and posts to make the website look attractive yet effective to consumers.


In the previous week, I was also asked to sit in with my supervisor for a brief on an upcoming project the company is having. A client retailer for the company's bikes has specially requested for a new line of fancy bicycles with loud and crazy colour schemes and patterns to launch. As such, we spent quite abit of time going through different colour charts and design templates to come up with plenty of designs to submit for approval. Around 100 - 200 units of special bikes will be produced with the designs we've selected.

It was a really fun yet challenging process of coming out with so many designs and there were plenty of factors to consider such as how the consumers would react etc. Great exposure and I'm glad that i was involved in this project!

Sunday, 22 May 2016

Into a new week!

Just a quick update before heading back to work tomorrow.

Last week, my LO visited me at my workplace. I could tell it was a very eye opening and new experience.

It was great to talk and discuss about internship progress and also insightful to hear about other company experiences from my LO. My supervisor also personally prepared and showed some materials and projects that the company undertakes.

This next week will be more packed and challenging and I'm looking forward to it! Will update more in the next post.

Tuesday, 10 May 2016

Week 4 Edits

< Into Week 4 >

This week, most of my colleagues are back from the Shanghai Bike Exhibition. 

As mentioned last week, I've been generating content and material for the website. I've recently downloaded Photoshop and have started learning how to edit and crop pictures for sale use.

Photoshop is a really useful tool with alot of editing capabilities. The last time I've used it was during secondary school (a very brief introduction). But now I realize it's a really great skill and tool to have. 

Product pictures can be edited nicely and clearly so that they appeal to customers. 

Here's a short example of some really basic and simple edits I've done yesterday.

Was trying out basic cropping and also removing the wordings on the brake caliper.


Really fun application to use and there's definitely a lot more for me to explore and learn!

Thursday, 5 May 2016

The Selling Process

< Professional Selling >

We're almost at the end of Week 3!

This week I've been continuously working on content and images for the company website and I've also been given the admin rights to familiarize myself with the online platform.

As mentioned in previous posts, I've been given more exposure to Aleoca's high performance customization carbon bikes. I've also been able to watch my boss handle and speak to clients who visit or call to place their custom bike orders. This just reminds me of what we've learnt in our Professional Selling module, the different steps that make up the selling process.

From the moment the customer calls/walks in, it all begins with a friendly handshake and a warm welcoming introduction. 

Moving further ahead into the selling process, I hear my supervisor asking the client exactly what type of bicycle he's looking for and also what type of riding he's commonly doing. It may all seem really simple and straightforward and it actually is -- we're simply finding out the customer's needs :)

As the conversation continues plenty of questions by the customer are answered. For example, why this kind of frame? What's the difference with this handlebar? Lots of technical questions which my supervisor replies and explains in the simplest and most understandable way.

As a seller it's not just about selling the most expensive bike or pushing clients to choose the best and pricey components (that he doesn't actually need). It's about understanding the needs of the customer and doing your best to meet those needs.

At the end of it all (alot of technical jargon), a built list of every single component for the customer's bike is completed, and each component is carefully picked to suit his style and type of riding!
The customer is satisfied, and so are we :)

Here's a list of all the different components and also some of the reasons why they've been selected!

Frame
The customer settled with an aluminium/carbon mix road frame. He isn't much of a road rider so an aluminium frame, although heavy, would provide more comfort and shock absorption during leisure riding. Something interesting with this particular frame is how the manufacturers blend the Carbon and alloy together:

 The Carbon is heat treated and fused together with the aluminium frame. This offers more stiffness on the rear stays!

Fork, Handlebar and Stem
Instead of the usual drop handlebars (those really low aggressive ones), we've prepared a set of flat (normal) handlebars to go with his frame. The flat bars give him a more upright and comfortable position. The handlebars we've chosen are also fully carbon.

His bike will also be fitted with a full carbon fork. You can clearly see the weave of the 12K Carbon Fiber:

And also an Aluminium Carbon-wrapped handle stem to hold it all together:
Lastly, just a few other components to go along as well: Saddle(left) and Carbon Shell Derailleur (Right)


Couple other components have been ordered and they'll be delivered soon for the customer.

To sum this post up, product knowledge is definitely important and I do hope to get a chance to learn and try out the selling process with customers in the future!


Monday, 2 May 2016

Higher Performance

< Carbon Fiber Construction >

The properties of carbon fiber, such as high stiffness, high tensile strength, low weight, light temperature tolerance and low thermal expansion, make them very popular in aerospace, military, motor racing, along with other competition sports including cycling.

Most bikes are made with aluminium or steel which are more affordable and also more durable. But these types of bikes do have their downsides as well, they are heavy and prone to rust.
An image showing a simple steel frame


Carbon Fiber on the other hand, is significantly lighter and stiffer. And a different layup of carbon fiber threads can result in different weaves of carbon with different properties (flex and strain)

That is why for Aleoca's High Performance Bikes, the frames and components are made of full carbon fiber in different layups of carbon. (Like many bikes in the market today)


The different types of carbon weave are mainly 3K, 12K, 1K and UD (Uni Directional). Plenty others exist but these are the common ones that the bikes here utilize.

The different weave numberings, (3K, 12K, 1K etc.) refer to the different woven fabrics that make carbon versatile to work with. Typically bunches of carbon fiber strands (yarn) are woven bi-directionally (weft and warp). The manner in which the weft and the warp are interwoven is the weave pattern. - (Windsail Bike, Carbon Fiber Explained, 2015)

Different carbon layups are used on different parts of the bike to optimize the riding experience. For example, a stiffer carbon at the bottom bracket (pedal area) so that all the power is transferred etc.


I have gotten a chance to tune some of the high end carbon bikes and also assembled a set of carbon fiber wheels.


The bike on the top is a Time Trial Bike, used in Time Trial Races or Triathlons. Aleoca produces this bike with UD Uni Directional Carbon. This bike is primarily built with optimal aerodynamics.


Here are a pair of custom built Carbon Wheels that are laced with Ceramic bearings. I got to assemble these wheels and help install them on a bike. 

These wheels are really deep (The length of the profile) as they are built to be aerodynamic. Yet they are still very light as they are fully carbon.

Installation includes placing the inner tube and tire on, and also fastening the caps of the hub and also the quick release.

In the process of installing the carbon wheels


Overall, the engineering behind carbon fiber is truly amazing. How thin strands of carbon thread can combine and take the weight of a rider at high speed and even other extreme cases is truly amazing. 

It is important to understand different types of materials and their properties before placing them together or building them.

More to come in the next post!